Difference between revisions of "Dr.'s Office Set"
From Nookipedia, the Animal Crossing wiki
(Adding image to infobox) |
HylianAngel (talk | contribs) (Updated infobox image and CF images.) |
||
| Line 1: | Line 1: | ||
{{Furniture Header | {{Furniture Header | ||
| − | | prev = | + | | prev = Dharma |
| − | | next = | + | | next = Drum |
| type = Set | | type = Set | ||
| − | | pfile = [[File: | + | | pfile = [[File:Dharma NL Model.png|48px|link=Dharma Set]] |
| − | | nfile = [[File: | + | | nfile = [[File:Conga Drum HHD Icon.png|48px|link=Drum Set]] |
}} | }} | ||
| − | |||
{{Infobox Furniture Collection | {{Infobox Furniture Collection | ||
| − | |name = | + | | name = Dr.'s Office Set |
| − | |image = [[File: | + | | image = [[File:NL Dr.'s Office Set.png|250px]] |
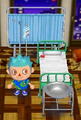
| − | |caption = | + | | caption = The Dr.'s Office Set in a room in {{NL}}. |
| − | |type = Set | + | | type = Set |
| − | |de-name = Krankenhaus | + | | de-name = Krankenhaus |
| − | |es-name = hospital | + | | es-name = hospital |
| − | |fr-name = dr.'s office | + | | fr-name = dr.'s office |
| − | |it-name = dr.'s office | + | | it-name = dr.'s office |
| − | |ja-name = びょういん | + | | ja-name = びょういん |
| − | |ko-name = 병원 | + | | ko-name = 병원 |
| − | |nl-name = N/A | + | | nl-name = N/A |
| − | |zh-name = N/A | + | | zh-name = N/A |
| − | |ru-name = N/A | + | | ru-name = N/A |
}} | }} | ||
The '''Dr.'s Office Set''' (known as the '''Hospital Set''' before {{NL|short}}) is a [[set|furniture set]] in the {{SER}}, consisting of items commonly found in a hospital environment. It was first introduced in {{WW}} with five items, and it reappeared in {{CF}} with eight items. Completing the set will grant the [[player]] an additional 5,000 points in {{WW|short|nolink}} and 8,000 points in {{CF|short|nolink}} to their [[HRA]] score. | The '''Dr.'s Office Set''' (known as the '''Hospital Set''' before {{NL|short}}) is a [[set|furniture set]] in the {{SER}}, consisting of items commonly found in a hospital environment. It was first introduced in {{WW}} with five items, and it reappeared in {{CF}} with eight items. Completing the set will grant the [[player]] an additional 5,000 points in {{WW|short|nolink}} and 8,000 points in {{CF|short|nolink}} to their [[HRA]] score. | ||
| Line 32: | Line 31: | ||
{{TableContent | {{TableContent | ||
| Hospital Bed | | Hospital Bed | ||
| − | | [[File:Hospital Bed WW.png|64px]] | + | | [[File:Hospital Bed WW Model.png|64px]] |
| {{Currency|Bells|3,600}} | | {{Currency|Bells|3,600}} | ||
| {{Currency|Bells|900}} | | {{Currency|Bells|900}} | ||
| Line 42: | Line 41: | ||
| Bed | | Bed | ||
}} | }} | ||
| − | |||
{{TableContent | {{TableContent | ||
| Scale | | Scale | ||
| − | | [[File:Scale WW.png|64px]] | + | | [[File:Scale WW Model.png|64px]] |
| {{Currency|Bells|1,200}} | | {{Currency|Bells|1,200}} | ||
| {{Currency|Bells|300}} | | {{Currency|Bells|300}} | ||
| Line 55: | Line 53: | ||
| - | | - | ||
}} | }} | ||
| − | |||
{{TableContent | {{TableContent | ||
| Stadiometer | | Stadiometer | ||
| − | | [[File:Stadiometer WW.png|64px]] | + | | [[File:Stadiometer WW Model.png|64px]] |
| {{Currency|Bells|1,680}} | | {{Currency|Bells|1,680}} | ||
| {{Currency|Bells|420}} | | {{Currency|Bells|420}} | ||
| Line 68: | Line 65: | ||
| - | | - | ||
}} | }} | ||
| − | |||
{{TableContent | {{TableContent | ||
| Trunk Measure | | Trunk Measure | ||
| − | | [[File:Trunk Measure WW.png|64px]] | + | | [[File:Trunk Measure WW Model.png|64px]] |
| {{Currency|Bells|1,680}} | | {{Currency|Bells|1,680}} | ||
| {{Currency|Bells|420}} | | {{Currency|Bells|420}} | ||
| Line 81: | Line 77: | ||
| Chair | | Chair | ||
}} | }} | ||
| − | |||
{{TableContent | {{TableContent | ||
| Vision Tester | | Vision Tester | ||
| − | | [[File:Vision Tester WW.png|64px]] | + | | [[File:Vision Tester WW Model.png|64px]] |
| {{Currency|Bells|2,280}} | | {{Currency|Bells|2,280}} | ||
| {{Currency|Bells|570}} | | {{Currency|Bells|570}} | ||
| Line 95: | Line 90: | ||
}} | }} | ||
{{TableFooter}} | {{TableFooter}} | ||
| − | |||
==={{CF|nolink}}=== | ==={{CF|nolink}}=== | ||
{{TableHeader|game=ACCF|type=furniture|collection=set|title=Hospital Set in {{CF|nolink}}|collapsed=true}} | {{TableHeader|game=ACCF|type=furniture|collection=set|title=Hospital Set in {{CF|nolink}}|collapsed=true}} | ||
| − | |||
{{TableContent | {{TableContent | ||
| Hospital Bed | | Hospital Bed | ||
| − | | [[File:Hospital Bed | + | | [[File:Hospital Bed CF Model.png|64px]] |
| {{Currency|Bells|3,600}} | | {{Currency|Bells|3,600}} | ||
| {{Currency|Bells|900}} | | {{Currency|Bells|900}} | ||
| Line 111: | Line 104: | ||
| Bed | | Bed | ||
}} | }} | ||
| − | |||
{{TableContent | {{TableContent | ||
| Hospital Screen | | Hospital Screen | ||
| − | | [[File:Hospital Screen | + | | [[File:Hospital Screen CF Model.png|64px]] |
| {{Currency|Bells|2,400}} | | {{Currency|Bells|2,400}} | ||
| {{Currency|Bells|600}} | | {{Currency|Bells|600}} | ||
| Line 123: | Line 115: | ||
| - | | - | ||
}} | }} | ||
| − | |||
{{TableContent | {{TableContent | ||
| IV Drip | | IV Drip | ||
| − | | [[File:IV Drip | + | | [[File:IV Drip CF Model.png|64px]] |
| {{Currency|Bells|1,480}} | | {{Currency|Bells|1,480}} | ||
| {{Currency|Bells|370}} | | {{Currency|Bells|370}} | ||
| Line 135: | Line 126: | ||
| - | | - | ||
}} | }} | ||
| − | |||
{{TableContent | {{TableContent | ||
| Scale | | Scale | ||
| − | | [[File:Scale | + | | [[File:Scale CF Model.png|64px]] |
| {{Currency|Bells|1,200}} | | {{Currency|Bells|1,200}} | ||
| {{Currency|Bells|300}} | | {{Currency|Bells|300}} | ||
| Line 147: | Line 137: | ||
| - | | - | ||
}} | }} | ||
| − | |||
{{TableContent | {{TableContent | ||
| Sink | | Sink | ||
| − | | [[File:Sink | + | | [[File:Sink CF Model.png|64px]] |
| {{Currency|Bells|1,200}} | | {{Currency|Bells|1,200}} | ||
| {{Currency|Bells|300}} | | {{Currency|Bells|300}} | ||
| Line 159: | Line 148: | ||
| - | | - | ||
}} | }} | ||
| − | |||
{{TableContent | {{TableContent | ||
| Stadiometer | | Stadiometer | ||
| − | | [[File:Stadiometer | + | | [[File:Stadiometer CF Model.png|64px]] |
| {{Currency|Bells|1,680}} | | {{Currency|Bells|1,680}} | ||
| {{Currency|Bells|420}} | | {{Currency|Bells|420}} | ||
| Line 171: | Line 159: | ||
| - | | - | ||
}} | }} | ||
| − | |||
{{TableContent | {{TableContent | ||
| Trunk Measure | | Trunk Measure | ||
| − | | [[File:Trunk Measure | + | | [[File:Trunk Measure CF Model.png|64px]] |
| {{Currency|Bells|1,680}} | | {{Currency|Bells|1,680}} | ||
| {{Currency|Bells|420}} | | {{Currency|Bells|420}} | ||
| Line 183: | Line 170: | ||
| Chair | | Chair | ||
}} | }} | ||
| − | |||
{{TableContent | {{TableContent | ||
| Vision Tester | | Vision Tester | ||
| − | | [[File:Vision Tester | + | | [[File:Vision Tester CF Model.png|64px]] |
| {{Currency|Bells|2,280}} | | {{Currency|Bells|2,280}} | ||
| {{Currency|Bells|570}} | | {{Currency|Bells|570}} | ||
| Line 196: | Line 182: | ||
}} | }} | ||
{{TableFooter}} | {{TableFooter}} | ||
| − | |||
==={{NL|nolink}}=== | ==={{NL|nolink}}=== | ||
{{TableHeader|game=ACNL|type=furniture|collection=set|title=Hospital Set in {{NL|nolink}}}} | {{TableHeader|game=ACNL|type=furniture|collection=set|title=Hospital Set in {{NL|nolink}}}} | ||
| − | |||
{{TableContent | {{TableContent | ||
| Hospital Bed | | Hospital Bed | ||
| Line 214: | Line 198: | ||
| No | | No | ||
}} | }} | ||
| − | |||
{{TableContent | {{TableContent | ||
| Hospital Screen | | Hospital Screen | ||
| Line 228: | Line 211: | ||
| No | | No | ||
}} | }} | ||
| − | |||
{{TableContent | {{TableContent | ||
| IV Drip | | IV Drip | ||
| Line 242: | Line 224: | ||
| No | | No | ||
}} | }} | ||
| − | |||
{{TableContent | {{TableContent | ||
| Scale | | Scale | ||
| Line 256: | Line 237: | ||
| No | | No | ||
}} | }} | ||
| − | |||
{{TableContent | {{TableContent | ||
| Stadiometer | | Stadiometer | ||
| Line 270: | Line 250: | ||
| No | | No | ||
}} | }} | ||
| − | |||
{{TableContent | {{TableContent | ||
| Trunk Measure | | Trunk Measure | ||
| Line 284: | Line 263: | ||
| No | | No | ||
}} | }} | ||
| − | |||
{{TableContent | {{TableContent | ||
| Vision Tester | | Vision Tester | ||
| Line 298: | Line 276: | ||
| No | | No | ||
}} | }} | ||
| − | |||
{{TableContent | {{TableContent | ||
| Washbasin | | Washbasin | ||
| Line 313: | Line 290: | ||
}} | }} | ||
{{TableFooter}} | {{TableFooter}} | ||
| − | < | + | |
| + | ==Gallery== | ||
| + | <gallery> | ||
| + | Hospital Set.png|The Hospital Set in {{CF|short|nolink}} | ||
| + | </gallery> | ||
{{Furniture}} | {{Furniture}} | ||
Revision as of 06:39, January 11, 2022
| ← 48px (Dharma) Previous Set | Furniture Set | Next Set (Drum) |
| ||||||||
 The Dr.'s Office Set in a room in Animal Crossing: New Leaf. | ||||||||
| Type | Set | |||||||
|---|---|---|---|---|---|---|---|---|
| Main appearances | ||||||||
|
| ||||||||
| Other appearances | ||||||||
Name in other languages
びょういん
병원 dr.'s office Krankenhaus
N/A
dr.'s office hospital N/A
N/A dr.'s office hospital N/A | ||||||||
The Dr.'s Office Set (known as the Hospital Set before New Leaf) is a furniture set in the Animal Crossing series, consisting of items commonly found in a hospital environment. It was first introduced in Animal Crossing: Wild World with five items, and it reappeared in Animal Crossing: City Folk with eight items. Completing the set will grant the player an additional 5,000 points in Wild World and 8,000 points in City Folk to their HRA score.
Item list
Animal Crossing: Wild World
Hospital Set in Animal Crossing: Wild World
| Item | Image | Buy Price | Sell Price | Available From | Group | Color(s) | Genre | Size | Info |
|---|---|---|---|---|---|---|---|---|---|
| Hospital Bed | 
|
- | Green / White | Modern/Chic | Bed | ||||
| Scale | 
|
B | Gray (x2) | Old School/Lovely | - | ||||
| Stadiometer | 
|
C | Brown(x2) | Old School/Lovely | - | ||||
| Trunk Measure | 
|
B | Brown (x2) | Old School/Lovely | Chair | ||||
| Vision Tester | 
|
A | White (x2) | Old School/Lovely | Usable |
Animal Crossing: City Folk
Hospital Set in Animal Crossing: City Folk
| Item | Image | Buy Price | Sell Price | Available From | Color(s) | Genre | Size | Info |
|---|---|---|---|---|---|---|---|---|
| Hospital Bed | 
|
Green / White | Trendy/Dignified | Bed | ||||
| Hospital Screen | 
|
Aqua / Gray | Retro/Dignified | - | ||||
| IV Drip | 
|
Spotlight item | Blue / Brown | Retro/Dignified | - | |||
| Scale | 
|
Gray (x2) | Retro/Playful | - | ||||
| Sink | 
|
Gray (x2) | Retro/Dignified | - | ||||
| Stadiometer | 
|
Brown (x2) | Retro/Playful | - | ||||
| Trunk Measure | 
|
Brown (x2) | Retro/Playful | Chair | ||||
| Vision Tester | 
|
White (x2) | Retro/Playful | Usable |
Animal Crossing: New Leaf
Hospital Set in Animal Crossing: New Leaf
| Item | Image | Buy Price | Sell Price | Available From | Color(s) | HHA Theme | Style | Size | Info | Customize |
|---|---|---|---|---|---|---|---|---|---|---|
| Hospital Bed | 
|
Nookling Stores | Green / White | Sci-Fi & Quirky | Flashy | Bed | No | |||
| Hospital Screen | 
|
Nookling Stores | Aqua / Gray | Sci-Fi & Quirky | Flashy | - | No | |||
| IV Drip | 
|
Nookling Stores | Aqua / Gray | Sci-Fi & Quirky | Flashy | - | No | |||
| Scale | 
|
Nookling Stores | Gray (x2) | Sci-Fi | Official | - | No | |||
| Stadiometer | 
|
Nookling Stores | Brown (x2) | Sci-Fi | Official | - | No | |||
| Trunk Measure | 
|
Nookling Stores | Brown (x2) | Sci-Fi | Official | Chair | No | |||
| Vision Tester | 
|
Nookling Stores | White (x2) | Sci-Fi | Official | Usable | No | |||
| Washbasin | 
|
Nookling Stores | Gray (x2) | Sci-Fi | Flashy | - | No |
Gallery
The Hospital Set in City Folk
