Difference between revisions of "Mad Scientist Theme"
From Nookipedia, the Animal Crossing wiki
m (+ PC) |
AlexBot2004 (talk | contribs) (→{{CF|nolink}}: Cargo) |
||
| (40 intermediate revisions by 7 users not shown) | |||
| Line 1: | Line 1: | ||
| − | + | {{Furniture Header | |
| + | | prev = Japanese | ||
| + | | next = Mario | ||
| + | | type = Theme | ||
| + | | pfile = [[File:Paper Lantern DnM+ Model.png|48px|link=Japanese Theme]] | ||
| + | | nfile = [[File:Fire Flower NL Model.png|48px|link=Mario Theme]] | ||
| + | }} | ||
| + | :''For the collection of lab items in New Horizons, see [[Furniture/New Horizons/Lab]].'' | ||
| + | {{Infobox Furniture Collection | ||
| + | | name = Mad Scientist Theme | ||
| + | | image = [[File:NL Mad Scientist Theme.png|250px]] | ||
| + | | caption = The Mad Scientist Theme in a room in {{NL|nolink}} | ||
| + | | type = Theme | ||
| + | | de-name = Labor | ||
| + | | es-name = científico loco | ||
| + | | fr-name = mad scientist | ||
| + | | it-name = mad scientist | ||
| + | | ja-name = サイエンティスト | ||
| + | | ko-name = 과학자 | ||
| + | | nl-name = N/A | ||
| + | | zh-name = N/A | ||
| + | | ru-name = N/A | ||
| + | }} | ||
| + | The '''Mad Scientist Theme''' is a [[theme (furniture)|furniture theme]] that first appears in {{WW}}. It is a collection of items themed after an evil scientist's laboratory. Some of the items from the Mad Scientist Theme appear in the [[Laboratory Set]] in {{PC}}. | ||
| + | __TOC__ | ||
| + | {{Clear}} | ||
| − | == | + | ==Item list== |
==={{WW|nolink}}=== | ==={{WW|nolink}}=== | ||
| − | {{ | + | {{TableTop Multi|game=WW|name=Mad Scientist Theme|collapsed=true}} |
| − | {{ | + | {{#cargo_compound_query: |
| − | + | tables=ww_furniture; | |
| − | + | group by=ww_furniture.en_name; | |
| − | + | fields=ww_furniture._pageName=page,ww_furniture.en_name=name,ww_furniture.image,CONCAT('Furniture')=type,ww_furniture.buy,ww_furniture.sell,ww_furniture.availability1,ww_furniture.availability2,ww_furniture.availability3; | |
| − | | | + | where=collection='Mad Scientist Theme'; |
| − | + | limit=100 | |
| − | + | |tables=ww_interior; | |
| − | + | group by=ww_interior.en_name; | |
| − | | | + | order by=ww_interior.category DESC; |
| − | | | + | fields=ww_interior._pageName=page,ww_interior.en_name=name,ww_interior.image=image,CONCAT('Interior')=type,ww_interior.buy,ww_interior.sell,ww_interior.availability1,ww_interior.availability2; |
| − | | | + | where=collection='Mad Scientist Theme'; |
| + | limit=100 | ||
| + | |format=template | ||
| + | |template=CargoDisplayWWMulti | ||
| + | |named args=yes | ||
}} | }} | ||
| − | + | {{TableFooter|note={{Community:ACWW Spreadsheet/Attribution}}}} | |
| − | |||
| − | |||
| − | |||
| − | |||
| − | |||
| − | |||
| − | |||
| − | |||
| − | |||
| − | |||
| − | |||
| − | |||
| − | |||
| − | |||
| − | |||
| − | |||
| − | |||
| − | |||
| − | |||
| − | |||
| − | |||
| − | |||
| − | |||
| − | |||
| − | |||
| − | |||
| − | |||
| − | |||
| − | |||
| − | |||
| − | |||
| − | |||
| − | |||
| − | |||
| − | |||
| − | |||
| − | |||
| − | |||
| − | |||
| − | |||
| − | |||
| − | |||
| − | |||
| − | |||
| − | |||
| − | |||
| − | |||
| − | |||
| − | |||
| − | |||
| − | |||
| − | |||
| − | |||
| − | |||
| − | |||
| − | |||
| − | |||
| − | |||
| − | |||
| − | |||
| − | |||
| − | |||
| − | |||
| − | |||
| − | |||
| − | |||
| − | |||
| − | |||
| − | |||
| − | |||
| − | |||
| − | {{TableFooter| | ||
| − | {{ | ||
| − | |||
| − | |||
| − | |||
| − | |||
| − | |||
| − | |||
| − | |||
| − | |||
| − | |||
| − | |||
| − | |||
| − | |||
| − | |||
| − | |||
| − | |||
| − | |||
| − | |||
| − | |||
==={{CF|nolink}}=== | ==={{CF|nolink}}=== | ||
| − | {{ | + | {{TableTop Multi|game=CF|name=Mad Scientist Theme|collapsed=true}} |
| − | {{ | + | {{#cargo_compound_query: |
| − | + | tables=cf_furniture; | |
| − | + | group by=cf_furniture.en_name; | |
| − | + | fields=cf_furniture._pageName=page,cf_furniture.en_name=name,cf_furniture.image,CONCAT('Furniture')=type,cf_furniture.buy,cf_furniture.sell,cf_furniture.availability1,cf_furniture.availability2,cf_furniture.availability3; | |
| − | + | where=collection='Mad Scientist Theme'; | |
| − | + | limit=100 | |
| − | + | |tables=cf_interior; | |
| − | + | group by=cf_interior.en_name; | |
| − | + | order by=cf_interior.category DESC; | |
| − | + | fields=cf_interior._pageName=page,cf_interior.en_name=name,cf_interior.image=image,CONCAT('Interior')=type,cf_interior.buy,cf_interior.sell,cf_interior.availability1,cf_interior.availability2; | |
| − | + | where=collection='Mad Scientist Theme'; | |
| − | + | limit=100 | |
| − | + | |format=template | |
| − | + | |template=CargoDisplayCFMulti | |
| − | + | |named args=yes | |
| − | |||
| − | |||
| − | |||
| − | |||
| − | |||
| − | |||
| − | |||
| − | |||
| − | |||
| − | |||
| − | |||
| − | |||
| − | |||
| − | |||
| − | | | ||
| − | |||
| − | |||
| − | |||
| − | |||
| − | |||
| − | |||
| − | |||
| − | |||
| − | |||
| − | |||
| − | |||
| − | |||
| − | |||
| − | |||
| − | |||
| − | |||
| − | |||
| − | |||
| − | |||
| − | |||
| − | |||
| − | |||
| − | |||
| − | |||
| − | |||
| − | |||
| − | |||
| − | |||
| − | |||
| − | |||
| − | |||
| − | |||
| − | |||
| − | |||
| − | |||
| − | |||
| − | |||
| − | |||
| − | |||
| − | |||
| − | |||
| − | |||
| − | |||
| − | | | ||
| − | | | ||
| − | | | ||
}} | }} | ||
| − | {{TableFooter| | + | {{TableFooter|note={{Community:ACCF Spreadsheet/Attribution}}}} |
| − | {{ | ||
| − | |||
| − | |||
| − | |||
| − | |||
| − | |||
| − | |||
| − | }} | ||
| − | |||
| − | |||
| − | |||
| − | |||
| − | |||
| − | |||
| − | |||
| − | |||
| − | |||
==={{NL|nolink}}=== | ==={{NL|nolink}}=== | ||
| − | {{ | + | {{TableTop Multi|game=NL|name=Mad Scientist Theme}} |
| − | {{ | + | {{#cargo_compound_query: |
| − | + | tables=nl_furniture,nl_furniture_variation; | |
| − | + | join on=nl_furniture_variation.en_name = nl_furniture.en_name; | |
| − | + | group by=nl_furniture.en_name; | |
| − | + | order by=nl_furniture.catalog_num,nl_furniture.en_name; | |
| − | + | fields=nl_furniture._pageName=pagename,nl_furniture.en_name=name,nl_furniture_variation.image,CONCAT('Furniture')=type,nl_furniture.buy1_price=buy1-price,nl_furniture.buy1_wikitext=buy1,nl_furniture.sell,nl_furniture.availability1,nl_furniture.availability2,nl_furniture.availability3,nl_furniture.availability_rv=availability-rv; | |
| − | + | where=collection='Mad Scientist Theme'; | |
| − | + | limit=100 | |
| − | + | |tables=nl_interior; | |
| − | + | group by=nl_interior.en_name; | |
| − | + | order by=nl_interior.category_sort,nl_interior.catalog_num; | |
| − | + | fields=nl_interior._pageName=page,nl_interior.en_name=name,nl_interior.image=image,CONCAT('Interior')=type,nl_interior.buy1_price=buy1-price,nl_interior.buy1_wikitext=buy1,nl_interior.sell,nl_interior.availability1,nl_interior.availability2,nl_interior.availability3,nl_interior.availability_rv=availability-rv; | |
| − | + | where=collection='Mad Scientist Theme'; | |
| − | + | limit=100 | |
| − | + | |format=template | |
| − | + | |template=CargoDisplayNLMulti | |
| − | + | |named args=yes | |
| − | |||
| − | |||
| − | |||
| − | |||
| − | |||
| − | |||
| − | |||
| − | |||
| − | |||
| − | |||
| − | |||
| − | |||
| − | |||
| − | |||
| − | |||
| − | |||
| − | |||
| − | |||
| − | |||
| − | |||
| − | |||
| − | |||
| − | |||
| − | |||
| − | |||
| − | |||
| − | |||
| − | |||
| − | |||
| − | |||
| − | |||
| − | |||
| − | |||
| − | |||
| − | |||
| − | |||
| − | |||
| − | |||
| − | |||
| − | |||
| − | |||
| − | |||
| − | |||
| − | |||
| − | |||
| − | |||
| − | |||
| − | |||
| − | |||
| − | |||
| − | |||
| − | |||
| − | |||
| − | |||
| − | |||
| − | |||
| − | |||
| − | |||
| − | |||
| − | |||
| − | |||
| − | |||
| − | |||
| − | |||
| − | |||
| − | |||
| − | |||
| − | |||
| − | |||
| − | |||
| − | |||
| − | |||
| − | |||
| − | |||
| − | |||
| − | |||
| − | |||
| − | |||
| − | |||
| − | |||
| − | |||
| − | |||
| − | |||
| − | |||
| − | |||
| − | |||
| − | |||
| − | | | ||
| − | |||
| − | |||
| − | |||
| − | |||
| − | |||
| − | |||
| − | |||
| − | |||
| − | |||
| − | |||
| − | |||
| − | == | ||
| − | |||
| − | |||
| − | |||
| − | |||
| − | |||
| − | |||
| − | |||
| − | |||
| − | |||
| − | |||
| − | |||
| − | |||
| − | |||
| − | |||
| − | |||
| − | |||
| − | |||
| − | |||
| − | |||
| − | |||
| − | |||
| − | |||
| − | |||
| − | |||
| − | |||
| − | |||
| − | |||
| − | |||
| − | |||
| − | |||
| − | |||
| − | |||
| − | |||
| − | |||
| − | |||
| − | |||
| − | |||
| − | |||
| − | |||
| − | |||
| − | |||
| − | |||
| − | |||
| − | |||
| − | |||
| − | |||
| − | |||
| − | |||
| − | |||
| − | |||
| − | | | ||
| − | | | ||
| − | | | ||
| − | |||
| − | |||
}} | }} | ||
| − | {{TableFooter}} | + | {{TableFooter|note={{Community:ACNL Spreadsheet/Attribution}}}} |
==Gallery== | ==Gallery== | ||
| − | <gallery | + | <gallery> |
| − | + | CF Mad Scientist Theme.png|The Mad Scientist Theme displayed in a room in {{CF|nolink}} | |
| − | |||
| − | |||
| − | |||
| − | |||
| − | |||
| − | |||
| − | |||
| − | |||
</gallery> | </gallery> | ||
| − | {{ | + | ==Notes== |
| − | {{ | + | {{Note list}} |
| − | [[Category:Furniture | + | |
| + | {{Navbox Furniture}} | ||
| + | [[Category:Furniture themes]] | ||
| + | [[Category:Wild World furniture collections]] | ||
| + | [[Category:City Folk furniture collections]] | ||
| + | [[Category:New Leaf furniture collections]] | ||
| + | [[Category:Happy Home Designer furniture collections]] | ||
Latest revision as of 04:11, April 28, 2024
| ← |
Furniture Theme | Next Theme (Mario) |
- For the collection of lab items in New Horizons, see Furniture/New Horizons/Lab.
| ||||||||
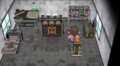
 The Mad Scientist Theme in a room in Animal Crossing: New Leaf | ||||||||
| Type | Theme | |||||||
|---|---|---|---|---|---|---|---|---|
| Main appearances | ||||||||
|
| ||||||||
| Other appearances | ||||||||
Name in other languages
サイエンティスト
N/A mad scientist científico loco mad scientist N/A
과학자 N/A mad scientist científico loco Labor N/A | ||||||||
The Mad Scientist Theme is a furniture theme that first appears in Animal Crossing: Wild World. It is a collection of items themed after an evil scientist's laboratory. Some of the items from the Mad Scientist Theme appear in the Laboratory Set in Animal Crossing: Pocket Camp.
Item list[edit]
Animal Crossing: Wild World[edit]
Mad Scientist Theme in Animal Crossing: Wild World
| Item | Image | Type | Buy price | Sell price | Available from |
|---|---|---|---|---|---|
| Amazing machine | 
|
Furniture | |||
| Complex machine | 
|
Furniture | |||
| Florence flask | 
|
Furniture | |||
| Lab bench | 
|
Furniture | |||
| Lab chair | 
|
Furniture | |||
| Medicine chest | 
|
Furniture | |||
| Unknown machine | 
|
Furniture | |||
| Lab wall | 
|
Interior | |||
| Lab floor | 
|
Interior |
Includes data sourced from the Data Spreadsheet for Animal Crossing: Wild World, compiled by AlexBot2004, TimeSword3D, Cuyler, SuperHamster, and PanchamBro.
Animal Crossing: City Folk[edit]
Mad Scientist Theme in Animal Crossing: City Folk
| Item | Image | Type | Buy price | Sell price | Available from |
|---|---|---|---|---|---|
| Amazing machine | 
|
Furniture | |||
| Complex machine | 
|
Furniture | |||
| Florence flask | 
|
Furniture | |||
| Lab bench | 
|
Furniture | |||
| Lab chair | 
|
Furniture | |||
| Medicine chest | 
|
Furniture | |||
| Unknown machine | 
|
Furniture | |||
| Lab wall | 
|
Interior | |||
| Lab floor | 
|
Interior |
Includes data sourced from the Data Spreadsheet for Animal Crossing: City Folk, compiled by TimeSword3D, AlexBot2004, and Cuyler.
Animal Crossing: New Leaf[edit]
Mad Scientist Theme in Animal Crossing: New Leaf
| Item | Image | Type | Buy price | Sell price[nb 1] | Available from |
|---|---|---|---|---|---|
| Amazing machine | 
|
Furniture | |||
| Complex machine | 
|
Furniture | |||
| Florence flask | 
|
Furniture | |||
| Lab bench | 
|
Furniture | |||
| Lab chair | 
|
Furniture | |||
| Medicine chest | 
|
Furniture | |||
| Unknown machine | 
|
Furniture | |||
| Lab wall | 
|
Interior | |||
| Lab floor | 
|
Interior |
Includes data sourced from the Data Spreadsheet for Animal Crossing: New Leaf, compiled by TimeSword3D, AlexBot2004, AlgebraManiacABC, Chubby Bub, Cuyler, HylianAngel, Kalina70, PanchamBro, SuperHamster, and vmario.
Gallery[edit]
The Mad Scientist Theme displayed in a room in Animal Crossing: City Folk

Notes[edit]
- ↑ Re-Tail sell price; if item can be sold at Timmy and Tommy's store, it is 80% of the sell price; if item can be sold to Leila at Tortimer Island, it is 5% of the sell price.