Difference between revisions of "Map"
m (typos fixed: part time → part-time, and and → and) |
(Undo revision 1114106 by 2603:9001:1300:28A7:399C:EAE7:BD93:58B1 (talk) It was referring to Pelly, not Kapp'n.) Tag: Undo |
||
| (34 intermediate revisions by 12 users not shown) | |||
| Line 1: | Line 1: | ||
| − | [[File:Map | + | [[File:Menu Map NH Icon.png|right|128px]] |
| − | The '''map''' is a key item in the {{SER}} the gives a top-down overview of the player's town. In {{PG}}, the | + | The '''map''' is a key item in the {{SER}} the gives a top-down overview of the [[player]]'s [[town]]. In {{PG}}, the player will get it while working part-time for [[Tom Nook]], and will be allowed to keep it through the whole game. In {{WW}}, [[Pelly]] will show the player how to use it in the [[town hall]]. [[Rover]] gives it to the player in {{CF}} on the bus ride. The player receives one from [[Porter]] after leaving the train in {{NL}}. In {{NH}}, the map is now an app on the player's [[NookPhone]]. |
| − | The map shows the player where [[:Category:Buildings|buildings]] are, along with the town's geographic features. Geographical features shown include | + | The map shows the player where [[:Category:Buildings|buildings]] are, along with the town's geographic features. Geographical features shown include sea, rivers, ponds, bridges, grassy areas, and dirt/sandy areas. Maps do not show the location of trees, rocks, flowers, [[rafflesia]]s, dropped items, cracks in the ground (where fossils, etc. are buried) signs, other animal villagers, bugs, or fish. There will be an actual list of each building on the side of the map. |
| − | == | + | ==Appearances== |
| − | [[File: | + | ===In {{PG|nolink}}=== |
| + | [[File:PG Map.jpg|thumb|left|198px|left|A typical town map in {{PG|nolink}}]] | ||
The map in {{PG}} is organized in a grid, with each square representing an acre. Visible are homes in purple, along with other buildings represented by red icons. | The map in {{PG}} is organized in a grid, with each square representing an acre. Visible are homes in purple, along with other buildings represented by red icons. | ||
| − | {{ | + | {{Clear}} |
| − | |||
| − | |||
| − | |||
| − | |||
| − | =='' | + | ===In {{WW|short|nolink}}=== |
| − | [[File: | + | [[File:WW Map.png|thumb|right|A town map in {{WW|short|nolink}}]] |
| + | In {{WW}}, [[Pelly]] gives the player a map in the town hall once the player first gets out of [[Kapp'n]]'s car and goes inside at the beginning of the game. She tells the player how to use it and says that it can open it by simply pressing "X," or by hitting the "Y" button and tapping the house icon with the player's stylus. | ||
| + | {{Clear}} | ||
| + | |||
| + | ===In {{CF|short|nolink}}=== | ||
| + | [[File:CF Map.png|thumb|left|A town map in {{CF|short|nolink}}]] | ||
In {{CF}}, the map is given to the player by [[Rover]] on the bus ride into town so the player can see the possible places the player can live, where the town hall is located, and all the other buildings. The map can be opened two ways; either by pointing the Wii remote at the screen and clicking on the house icon, or by pressing the d-pad (+) button on the remote to show the main menu. Like in the two prequels to this game, all maps are randomly generated and two are very rarely identical. | In {{CF}}, the map is given to the player by [[Rover]] on the bus ride into town so the player can see the possible places the player can live, where the town hall is located, and all the other buildings. The map can be opened two ways; either by pointing the Wii remote at the screen and clicking on the house icon, or by pressing the d-pad (+) button on the remote to show the main menu. Like in the two prequels to this game, all maps are randomly generated and two are very rarely identical. | ||
| − | {| class=" | + | {| class="styled mw-collapsible mw-collapsed color-gameplay" |
| − | + | !Icon | |
!Meaning | !Meaning | ||
|- | |- | ||
| − | |[[File:Bridge. | + | |[[File:Bridge CF Icon.png|Bridge]] |
| − | |Bridge | + | |[[Bridge]] |
|- | |- | ||
| − | |[[File:Bus Stop.png|Bus Stop]] | + | |[[File:Bus Stop CF Icon.png|Bus Stop]] |
| − | |Bus | + | |[[Bus stop]] |
|- | |- | ||
| − | |[[File:Empty House.png| | + | |[[File:Empty House CF Icon.png|Empty or other player's house]] |
| − | |Empty or other | + | |Empty or other player's house |
|- | |- | ||
| − | |[[File:Town Gate.png| | + | |[[File:Town Gate CF Icon.png|Checkpoint]] |
| − | | | + | |[[Checkpoint]] |
|- | |- | ||
| − | |[[File:Holding Pond. | + | |[[File:Holding Pond CF Icon.png|Holding pond]] |
| − | | | + | |[[Pond]] |
|- | |- | ||
| − | |[[File:Museum.png|Museum]] | + | |[[File:Museum CF Icon.png|Museum]] |
| − | |Museum | + | |[[Museum]] |
|- | |- | ||
| − | |[[File:Nook's Shop.png|Nook's Shop]] | + | |[[File:Nook's Shop CF Icon.png|Nook's Shop]] |
| − | |Nook's | + | |[[Tom Nook's store]] |
|- | |- | ||
| − | |[[File:Player | + | |[[File:Player CF Icon.png|Players location]] |
| − | | | + | |Player's location |
|- | |- | ||
| − | |[[File: | + | |[[File:Ramp CF Icon.png|Ramp]] |
| − | | | + | |[[Incline|Ramp]] |
|- | |- | ||
| − | |[[File: | + | |[[File:Able Sisters CF Icon.png|Able Sisters]] |
| − | | | + | |[[Able Sisters]] |
|- | |- | ||
| − | |[[File: | + | |[[File:Town Hall CF Icon.png|Town Hall]] |
| − | | | + | |[[Town Hall]] |
|- | |- | ||
| − | |[[File: | + | |[[File:Villager House CF Icon.png|Villager house]] |
| − | | | + | |[[Villager house]] |
|- | |- | ||
| − | |[[File: | + | |[[File:Waterfall CF Icon.png|Waterfall]] |
| − | + | |[[Waterfall]] | |
| − | |||
| − | |[[ | ||
| − | |||
|- | |- | ||
|[[File:Your House.png|Current players house]] | |[[File:Your House.png|Current players house]] | ||
| − | |Current | + | |Current [[Player house|player's house]] |
|} | |} | ||
| − | {{ | + | {{Clear}} |
| − | |||
| − | |||
| − | |||
| − | In {{ | + | ===In {{NL|short|nolink}}=== |
| + | [[File:NL Map.png|thumb|right|A map from {{NL|short|nolink}}]] | ||
| + | In {{NL}}, the map is more or less the same as previous games, though appears more visually detailed. However, when the player creates their new town, they are given a choice of four maps by [[Rover]]. [[Public works project]]s do not appear on the map, with the exception of the [[police station]], [[Campsite (facility)|campsite]], [[The Roost]], and [[bridge]]s. | ||
| − | + | In {{NLWa}}, a signpost icon is added to the left or right side of the map, which shows the location of the [[campground]] entrance. | |
| + | {{Clear}} | ||
| − | [[File: | + | ===In {{HHD|short|nolink}}=== |
| + | [[File:HHD Map.jpg|thumb|left|A map from {{HHD|short|nolink}}]] | ||
The map also makes an appearance in {{HHD}}. It is used to select a location for a villager's house that the player is about to design. | The map also makes an appearance in {{HHD}}. It is used to select a location for a villager's house that the player is about to design. | ||
| + | {{Clear}} | ||
| + | |||
| + | ===In {{NH|short|nolink}}=== | ||
| + | [[File:NH Map.jpg|thumb|right|A map from {{NH|short|nolink}}]] | ||
| + | In {{NH}}, [[Tom Nook]] will give the player a [[NookPhone]] after they sleep in their tent at the end of their first day. The NookPhone has a map app which will allow the player to view the town's map, as well as toggle the presence of the minimap which shows up in the bottom-right of the screen; they can choose to have it hidden while they are moving, or to have it always on or always off. Much like with {{NL|short|nolink}}, the player gets four randomly generated choices for their map layout while creating their island, though the use of terraforming tools, which are unlocked later, can allow the player to alter the layout of their island. The map is even more detailed than in previous games, even showing the icons for villagers which live in each house on the right-hand sidebar, and graphics for the [[Airport]], [[Resident Services]], and any facilities constructed by the player will show up to the left of the map, even reflecting the state of the building; whether it is completed or currently under construction. Bridges and inclines the player has built will also show up on the map, along with a thin outline for structures that have yet to be built. | ||
| − | {{ | + | {{Navbox Gameplay elements}} |
Latest revision as of 01:29, May 17, 2023
The map is a key item in the Animal Crossing series the gives a top-down overview of the player's town. In Animal Crossing, the player will get it while working part-time for Tom Nook, and will be allowed to keep it through the whole game. In Animal Crossing: Wild World, Pelly will show the player how to use it in the town hall. Rover gives it to the player in Animal Crossing: City Folk on the bus ride. The player receives one from Porter after leaving the train in Animal Crossing: New Leaf. In Animal Crossing: New Horizons, the map is now an app on the player's NookPhone.
The map shows the player where buildings are, along with the town's geographic features. Geographical features shown include sea, rivers, ponds, bridges, grassy areas, and dirt/sandy areas. Maps do not show the location of trees, rocks, flowers, rafflesias, dropped items, cracks in the ground (where fossils, etc. are buried) signs, other animal villagers, bugs, or fish. There will be an actual list of each building on the side of the map.
Appearances[edit]
In Animal Crossing[edit]
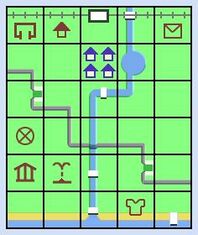
The map in Animal Crossing is organized in a grid, with each square representing an acre. Visible are homes in purple, along with other buildings represented by red icons.
In Wild World[edit]
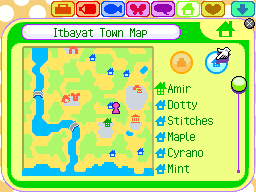
In Animal Crossing: Wild World, Pelly gives the player a map in the town hall once the player first gets out of Kapp'n's car and goes inside at the beginning of the game. She tells the player how to use it and says that it can open it by simply pressing "X," or by hitting the "Y" button and tapping the house icon with the player's stylus.
In City Folk[edit]
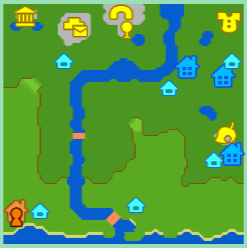
In Animal Crossing: City Folk, the map is given to the player by Rover on the bus ride into town so the player can see the possible places the player can live, where the town hall is located, and all the other buildings. The map can be opened two ways; either by pointing the Wii remote at the screen and clicking on the house icon, or by pressing the d-pad (+) button on the remote to show the main menu. Like in the two prequels to this game, all maps are randomly generated and two are very rarely identical.
| Icon | Meaning |
|---|---|
| Bridge | |
| Bus stop | |
| Empty or other player's house | |
| Checkpoint | |
| Pond | |
| Museum | |
| Tom Nook's store | |
| Player's location | |
| Ramp | |
| Able Sisters | |
| Town Hall | |
| Villager house | |
| Waterfall | |
| Current player's house |
In New Leaf[edit]
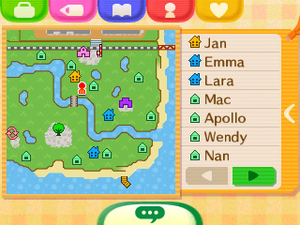
In Animal Crossing: New Leaf, the map is more or less the same as previous games, though appears more visually detailed. However, when the player creates their new town, they are given a choice of four maps by Rover. Public works projects do not appear on the map, with the exception of the police station, campsite, The Roost, and bridges.
In Animal Crossing: New Leaf - Welcome amiibo, a signpost icon is added to the left or right side of the map, which shows the location of the campground entrance.
In Happy Home Designer[edit]
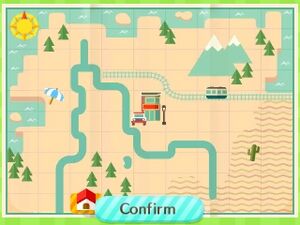
The map also makes an appearance in Animal Crossing: Happy Home Designer. It is used to select a location for a villager's house that the player is about to design.
In New Horizons[edit]
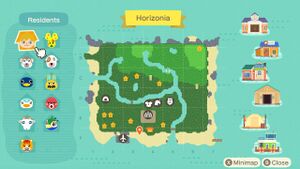
In Animal Crossing: New Horizons, Tom Nook will give the player a NookPhone after they sleep in their tent at the end of their first day. The NookPhone has a map app which will allow the player to view the town's map, as well as toggle the presence of the minimap which shows up in the bottom-right of the screen; they can choose to have it hidden while they are moving, or to have it always on or always off. Much like with New Leaf, the player gets four randomly generated choices for their map layout while creating their island, though the use of terraforming tools, which are unlocked later, can allow the player to alter the layout of their island. The map is even more detailed than in previous games, even showing the icons for villagers which live in each house on the right-hand sidebar, and graphics for the Airport, Resident Services, and any facilities constructed by the player will show up to the left of the map, even reflecting the state of the building; whether it is completed or currently under construction. Bridges and inclines the player has built will also show up on the map, along with a thin outline for structures that have yet to be built.
| Gameplay elements | ||||||||||||||||||||||||||
|---|---|---|---|---|---|---|---|---|---|---|---|---|---|---|---|---|---|---|---|---|---|---|---|---|---|---|
| ||||||||||||||||||||||||||
