Difference between revisions of "Animal Crossing: Wild World/Gallery"
PanchamBro (talk | contribs) m (Text replacement - "<tab name="([^"]+)">" to "{{TabHeader|$1}}") |
PanchamBro (talk | contribs) m (Text replacement - "</tab> " to "") |
||
| Line 331: | Line 331: | ||
| style="width:100px;"| {{WW icon|Cube}}{{WW icon|Cyrano}}{{WW icon|Hugh}}{{WW icon|Kid Cat}}{{WW icon|Maelle}}{{WW icon|Pecan}}{{WW icon|Victoria}} | | style="width:100px;"| {{WW icon|Cube}}{{WW icon|Cyrano}}{{WW icon|Hugh}}{{WW icon|Kid Cat}}{{WW icon|Maelle}}{{WW icon|Pecan}}{{WW icon|Victoria}} | ||
|} | |} | ||
| − | |||
{{TabHeader|House Model #2 (B)}} | {{TabHeader|House Model #2 (B)}} | ||
{| cellpadding=5px | {| cellpadding=5px | ||
| Line 363: | Line 362: | ||
| style="width:100px;"| {{WW icon|Antonio}}{{WW icon|Deena}}{{WW icon|Goose}}{{WW icon|Hopper}}{{WW icon|Nibbles}}{{WW icon|Savannah}} | | style="width:100px;"| {{WW icon|Antonio}}{{WW icon|Deena}}{{WW icon|Goose}}{{WW icon|Hopper}}{{WW icon|Nibbles}}{{WW icon|Savannah}} | ||
|} | |} | ||
| − | |||
{{TabHeader|House Model #3 (C)}} | {{TabHeader|House Model #3 (C)}} | ||
{| cellpadding=5px | {| cellpadding=5px | ||
| Line 395: | Line 393: | ||
| style="width:100px;"| {{WW icon|Agent S}}{{WW icon|Benedict}}{{WW icon|Elmer}}{{WW icon|Friga}}{{WW icon|Gwen}}{{WW icon|Lucy}}{{WW icon|Nana}}{{WW icon|Pango}}{{WW icon|Pompom}}{{WW icon|Teddy}} | | style="width:100px;"| {{WW icon|Agent S}}{{WW icon|Benedict}}{{WW icon|Elmer}}{{WW icon|Friga}}{{WW icon|Gwen}}{{WW icon|Lucy}}{{WW icon|Nana}}{{WW icon|Pango}}{{WW icon|Pompom}}{{WW icon|Teddy}} | ||
|} | |} | ||
| − | |||
{{TabHeader|House Model #4 (D)}} | {{TabHeader|House Model #4 (D)}} | ||
{| cellpadding=5px | {| cellpadding=5px | ||
| Line 427: | Line 424: | ||
| style="width:100px;"| {{WW icon|Caroline}}{{WW icon|Curly}}{{WW icon|Egbert}}{{WW icon|Elvis}}{{WW icon|Freckles}}{{WW icon|Kitt}}{{WW icon|Mallary}}{{WW icon|Pinky}}{{WW icon|Stitches}}{{WW icon|Tammi}}{{WW icon|Tipper}} | | style="width:100px;"| {{WW icon|Caroline}}{{WW icon|Curly}}{{WW icon|Egbert}}{{WW icon|Elvis}}{{WW icon|Freckles}}{{WW icon|Kitt}}{{WW icon|Mallary}}{{WW icon|Pinky}}{{WW icon|Stitches}}{{WW icon|Tammi}}{{WW icon|Tipper}} | ||
|} | |} | ||
| − | |||
{{TabHeader|House Model #5 (A)}} | {{TabHeader|House Model #5 (A)}} | ||
{| cellpadding=5px | {| cellpadding=5px | ||
| Line 459: | Line 455: | ||
| style="width:100px;"| {{WW icon|Bluebear}}{{WW icon|Curt}}{{WW icon|Mathilda}}{{WW icon|Opal}}{{WW icon|Rolf}}{{WW icon|Sally}}{{WW icon|Static}}{{WW icon|Truffles}} | | style="width:100px;"| {{WW icon|Bluebear}}{{WW icon|Curt}}{{WW icon|Mathilda}}{{WW icon|Opal}}{{WW icon|Rolf}}{{WW icon|Sally}}{{WW icon|Static}}{{WW icon|Truffles}} | ||
|} | |} | ||
| − | |||
{{TabHeader|House Model #6 (B)}} | {{TabHeader|House Model #6 (B)}} | ||
{| cellpadding=5px | {| cellpadding=5px | ||
| Line 491: | Line 486: | ||
| style="width:100px;"| {{WW icon|Chow}}{{WW icon|Dizzy}}{{WW icon|Genji}}{{WW icon|Maple}}{{WW icon|Mint}}{{WW icon|Pierce}}{{WW icon|Rasher}}{{WW icon|Roscoe}}{{WW icon|Rowan}}{{WW icon|Yuka}} | | style="width:100px;"| {{WW icon|Chow}}{{WW icon|Dizzy}}{{WW icon|Genji}}{{WW icon|Maple}}{{WW icon|Mint}}{{WW icon|Pierce}}{{WW icon|Rasher}}{{WW icon|Roscoe}}{{WW icon|Rowan}}{{WW icon|Yuka}} | ||
|} | |} | ||
| − | |||
{{TabHeader|House Model #7 (C)}} | {{TabHeader|House Model #7 (C)}} | ||
{| cellpadding=5px | {| cellpadding=5px | ||
| Line 523: | Line 517: | ||
| style="width:100px;"| {{WW icon|Alice}}{{WW icon|Alli}}{{WW icon|Big Top}}{{WW icon|Bunnie}}{{WW icon|Champ}}{{WW icon|Chief}}{{WW icon|Daisy}}{{WW icon|Jay}}{{WW icon|Jitters}}{{WW icon|Poncho}} | | style="width:100px;"| {{WW icon|Alice}}{{WW icon|Alli}}{{WW icon|Big Top}}{{WW icon|Bunnie}}{{WW icon|Champ}}{{WW icon|Chief}}{{WW icon|Daisy}}{{WW icon|Jay}}{{WW icon|Jitters}}{{WW icon|Poncho}} | ||
|} | |} | ||
| − | |||
{{TabHeader|House Model #8 (D)}} | {{TabHeader|House Model #8 (D)}} | ||
{| cellpadding=5px | {| cellpadding=5px | ||
| Line 555: | Line 548: | ||
| style="width:100px;"| {{WW icon|Bud}}{{WW icon|Dotty}}{{WW icon|Eloise}}{{WW icon|Lobo}}{{WW icon|Pudge}}{{WW icon|Robin}}{{WW icon|Wolfgang}} | | style="width:100px;"| {{WW icon|Bud}}{{WW icon|Dotty}}{{WW icon|Eloise}}{{WW icon|Lobo}}{{WW icon|Pudge}}{{WW icon|Robin}}{{WW icon|Wolfgang}} | ||
|} | |} | ||
| − | |||
{{TabHeader|House Model #9 (A)}} | {{TabHeader|House Model #9 (A)}} | ||
{| cellpadding=5px | {| cellpadding=5px | ||
| Line 587: | Line 579: | ||
| style="width:100px;"| {{WW icon|Anchovy}}{{WW icon|Coco}}{{WW icon|Dora}}{{WW icon|Jeremiah}}{{WW icon|Melba}}{{WW icon|Patty}}{{WW icon|Ribbot}} | | style="width:100px;"| {{WW icon|Anchovy}}{{WW icon|Coco}}{{WW icon|Dora}}{{WW icon|Jeremiah}}{{WW icon|Melba}}{{WW icon|Patty}}{{WW icon|Ribbot}} | ||
|} | |} | ||
| − | |||
{{TabHeader|House Model #10 (B)}} | {{TabHeader|House Model #10 (B)}} | ||
{| cellpadding=5px | {| cellpadding=5px | ||
| Line 619: | Line 610: | ||
| style="width:100px;"| {{WW icon|Alfonso}}{{WW icon|Angus}}{{WW icon|Kody}}{{WW icon|Lily}}{{WW icon|Limberg}}{{WW icon|Snake}} | | style="width:100px;"| {{WW icon|Alfonso}}{{WW icon|Angus}}{{WW icon|Kody}}{{WW icon|Lily}}{{WW icon|Limberg}}{{WW icon|Snake}} | ||
|} | |} | ||
| − | |||
{{TabHeader|House Model #11 (C)}} | {{TabHeader|House Model #11 (C)}} | ||
{| cellpadding=5px | {| cellpadding=5px | ||
| Line 651: | Line 641: | ||
| style="width:100px;"| {{WW icon|Bella}}{{WW icon|Bob}}{{WW icon|Frobert}}{{WW icon|Gaston}}{{WW icon|Goldie}}{{WW icon|Peewee}}{{WW icon|Rodeo}} | | style="width:100px;"| {{WW icon|Bella}}{{WW icon|Bob}}{{WW icon|Frobert}}{{WW icon|Gaston}}{{WW icon|Goldie}}{{WW icon|Peewee}}{{WW icon|Rodeo}} | ||
|} | |} | ||
| − | |||
{{TabHeader|House Model #12 (D)}} | {{TabHeader|House Model #12 (D)}} | ||
{| cellpadding=5px | {| cellpadding=5px | ||
| Line 683: | Line 672: | ||
| style="width:100px;"| {{WW icon|Bree}}{{WW icon|Butch}}{{WW icon|Camofrog}}{{WW icon|Gabi}}{{WW icon|Mitzi}}{{WW icon|Rhonda}}{{WW icon|Simon}} | | style="width:100px;"| {{WW icon|Bree}}{{WW icon|Butch}}{{WW icon|Camofrog}}{{WW icon|Gabi}}{{WW icon|Mitzi}}{{WW icon|Rhonda}}{{WW icon|Simon}} | ||
|} | |} | ||
| − | |||
{{TabHeader|House Model #13 (A)}} | {{TabHeader|House Model #13 (A)}} | ||
{| cellpadding=5px | {| cellpadding=5px | ||
| Line 715: | Line 703: | ||
| style="width:100px;"| {{WW icon|Drift}}{{WW icon|Lucky}}{{WW icon|Margie}}{{WW icon|Octavian}}{{WW icon|Pippy}}{{WW icon|Rosie}} | | style="width:100px;"| {{WW icon|Drift}}{{WW icon|Lucky}}{{WW icon|Margie}}{{WW icon|Octavian}}{{WW icon|Pippy}}{{WW icon|Rosie}} | ||
|} | |} | ||
| − | |||
{{TabHeader|House Model #14 (B)}} | {{TabHeader|House Model #14 (B)}} | ||
{| cellpadding=5px | {| cellpadding=5px | ||
| Line 747: | Line 734: | ||
| style="width:100px;"| {{WW icon|Biskit}}{{WW icon|Boone}}{{WW icon|Elise}}{{WW icon|Marina}}{{WW icon|Olivia}}{{WW icon|Tiffany}}{{WW icon|Wart Jr.}} | | style="width:100px;"| {{WW icon|Biskit}}{{WW icon|Boone}}{{WW icon|Elise}}{{WW icon|Marina}}{{WW icon|Olivia}}{{WW icon|Tiffany}}{{WW icon|Wart Jr.}} | ||
|} | |} | ||
| − | |||
{{TabHeader|House Model #15 (C)}} | {{TabHeader|House Model #15 (C)}} | ||
{| cellpadding=5px | {| cellpadding=5px | ||
| Line 779: | Line 765: | ||
| style="width:100px;"| {{WW icon|Bones}}{{WW icon|Drake}}{{WW icon|Kiki}}{{WW icon|Monique}}{{WW icon|Puddles}}{{WW icon|Queenie}}{{WW icon|Tank}}{{WW icon|Twiggy}} | | style="width:100px;"| {{WW icon|Bones}}{{WW icon|Drake}}{{WW icon|Kiki}}{{WW icon|Monique}}{{WW icon|Puddles}}{{WW icon|Queenie}}{{WW icon|Tank}}{{WW icon|Twiggy}} | ||
|} | |} | ||
| − | |||
{{TabHeader|House Model #16 (D)}} | {{TabHeader|House Model #16 (D)}} | ||
{| cellpadding=5px | {| cellpadding=5px | ||
| Line 811: | Line 796: | ||
| style="width:100px;"| {{WW icon|Chevre}}{{WW icon|Gladys}}{{WW icon|Portia}}{{WW icon|Tangy}}{{WW icon|Vesta}}{{WW icon|Whitney}} | | style="width:100px;"| {{WW icon|Chevre}}{{WW icon|Gladys}}{{WW icon|Portia}}{{WW icon|Tangy}}{{WW icon|Vesta}}{{WW icon|Whitney}} | ||
|} | |} | ||
| − | |||
{{TabHeader|House Model #17 (A)}} | {{TabHeader|House Model #17 (A)}} | ||
{| cellpadding=5px | {| cellpadding=5px | ||
| Line 843: | Line 827: | ||
| style="width:100px;"| {{WW icon|Apollo}}{{WW icon|Nan}}{{WW icon|Punchy}}{{WW icon|Walker}} | | style="width:100px;"| {{WW icon|Apollo}}{{WW icon|Nan}}{{WW icon|Punchy}}{{WW icon|Walker}} | ||
|} | |} | ||
| − | |||
{{TabHeader|House Model #18 (B)}} | {{TabHeader|House Model #18 (B)}} | ||
{| cellpadding=5px | {| cellpadding=5px | ||
| Line 875: | Line 858: | ||
| style="width:100px;"| {{WW icon|Amelia}}{{WW icon|Anabelle}}{{WW icon|Baabara}}{{WW icon|Bill}}{{WW icon|Cesar}}{{WW icon|Derwin}}{{WW icon|Peanut}}{{WW icon|Purrl}}{{WW icon|Tabby}} | | style="width:100px;"| {{WW icon|Amelia}}{{WW icon|Anabelle}}{{WW icon|Baabara}}{{WW icon|Bill}}{{WW icon|Cesar}}{{WW icon|Derwin}}{{WW icon|Peanut}}{{WW icon|Purrl}}{{WW icon|Tabby}} | ||
|} | |} | ||
| − | |||
{{TabHeader|House Model #19 (C)}} | {{TabHeader|House Model #19 (C)}} | ||
{| cellpadding=5px | {| cellpadding=5px | ||
| Line 907: | Line 889: | ||
| style="width:100px;"| {{WW icon|Aurora}}{{WW icon|Blaire}}{{WW icon|Joey}}{{WW icon|Moe}}{{WW icon|Rocco}}{{WW icon|Samson}} | | style="width:100px;"| {{WW icon|Aurora}}{{WW icon|Blaire}}{{WW icon|Joey}}{{WW icon|Moe}}{{WW icon|Rocco}}{{WW icon|Samson}} | ||
|} | |} | ||
| − | |||
{{TabHeader|House Model #20 (D)}} | {{TabHeader|House Model #20 (D)}} | ||
{| cellpadding=5px | {| cellpadding=5px | ||
| Line 939: | Line 920: | ||
| style="width:100px;"| {{WW icon|Buck}}{{WW icon|Filbert}}{{WW icon|Kabuki}}{{WW icon|Monty}}{{WW icon|Pate}}{{WW icon|Roald}}{{WW icon|Rod}}{{WW icon|Ruby}} | | style="width:100px;"| {{WW icon|Buck}}{{WW icon|Filbert}}{{WW icon|Kabuki}}{{WW icon|Monty}}{{WW icon|Pate}}{{WW icon|Roald}}{{WW icon|Rod}}{{WW icon|Ruby}} | ||
|} | |} | ||
| − | |||
{{TabEnd}} | {{TabEnd}} | ||
</div> | </div> | ||
Revision as of 18:49, December 15, 2022
This is a gallery for any images related to Animal Crossing: Wild World.
Logos
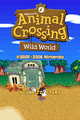
- Animal Crossing- Wild World (logo).png
English logo

English logo (in-game)
- Animal Crossing DS Logo.png
Early English logo (E3 2005)
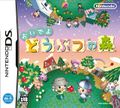
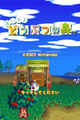
- WW Logo Japan.jpg
Japanese logo

Japanese logo (in-game)

Korean logo

Box art and media
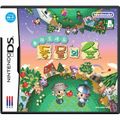
Japanese box art (front)
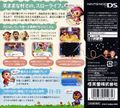
Japanese box art (back)
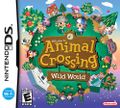
North American box art (front)
- WW Box Back North America.jpg
North American box art (back)
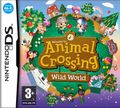
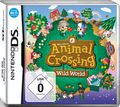
European box art (front)
European box art (back)
German box art (front)
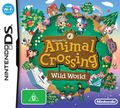
Australian box art (front)
Korean box art (front)
Wii U eShop icon
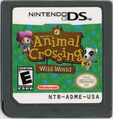
North American Game Card
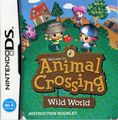
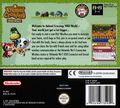
North American instruction booklet
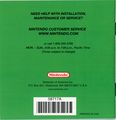
North American instruction booklet (back)
Nintendo Power flyer


Artwork
Players


Special characters
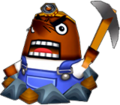
Mr. Resetti


Villagers


Locations
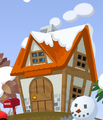
A House


Other artwork
Artwork for the game cover
- Spring ACWW.png
- WWSummer.png
- Winter ACWW.png
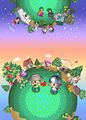
- SeasonsWW.jpg
A wallpaper depicting all seasons
- Animal-crossing-wild-world.jpg
- MintWallpaper.jpg
- WWFriends.jpg
- ACWWPostcardInsertVol199Front.JPG
Nintendo Power postcards


Sprites and models
Special characters
- Tom Nook WW Model.png
Villagers


Houses
|
|


|
|


|
|


|
|


|
|


|
|


|
|


|
|


|
|


|
|


|
|


|
|


|
|


|
|


|
|


|
|


|
|


|
|


|
|


|
|


Items and objects

Oak Tree

Apple Tree

Cherry Tree

Orange Tree

Peach Tree

Pear Tree

Oak Tree Stump

Coconut Tree

Four-Leaf Clover

Helmet

Golden Axe

Golden Rod

Golden Net

Golden Slingshot

Golden Shovel

Tool Box

Golden Tool Box

Bug Container

Conch

Coral

Scallop

Fossil (Identified)

Item Box

Key

Note in a Bottle

Paper Bag

Party Popper

Roman Candle

UFO Part


Icons

100 Bells

1,000 Bells

30,000 Bells

99,000 Bells

Small Acorn

Large Acorn

Round Acorn

Rotten Acorn

Cherry

Coconut

Orange

Peach

Pear

Axe (damaged)

Axe (damaged)

Golden Axe

Golden Rod

Golden Net

Golden Shovel

Golden Slingshot

Golden Can

Empty Can

Old Tire

Coral

Dall's Top

Pearl Oyster

Porceletta

Sand Dollar

Scallop

White Scallop

Dandelion Puff

Flower Bag

Cedar Sapling

Roman Candle

Carpet (delivery)

Fossil (identified)

Headwear (helmet)

Wallpaper (delivery)

Pitfall Seed

Present (delivery)

UFO Part
Question/character icons

Name
TV shows

Comedy

Cartoons

Cartoons

Off-Air Static

Off-Air test pattern (North America)

Off-Air test pattern (PAL)

Off-Air test pattern (Japan)


Miscellaneous

Home Menu icon
Screenshots
Further details: Needs more screenshots of the final game (see Category:Wild World screenshots)
Further details: Needs more screenshots of the final game (see Category:Wild World screenshots)
- WWTitleScreen.png
Title screen
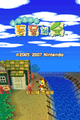
Title screen (Japan)
Title screen (Europe)
Title screen (Korea)


Pre-release
- Wild World Beta 4.jpg
E3 2004
- Wild World Beta 1.jpg
- WWBetaPockets1.jpg
- WWBetaDesignWindow2.jpg


